Friday, August 30, 2013

An Update on our Dirty Little Secret - A Laundry Room Reveal!!

Okay, back many months ago...I showed this picture of "our dirty little secret"...this is the only photo I showed you..


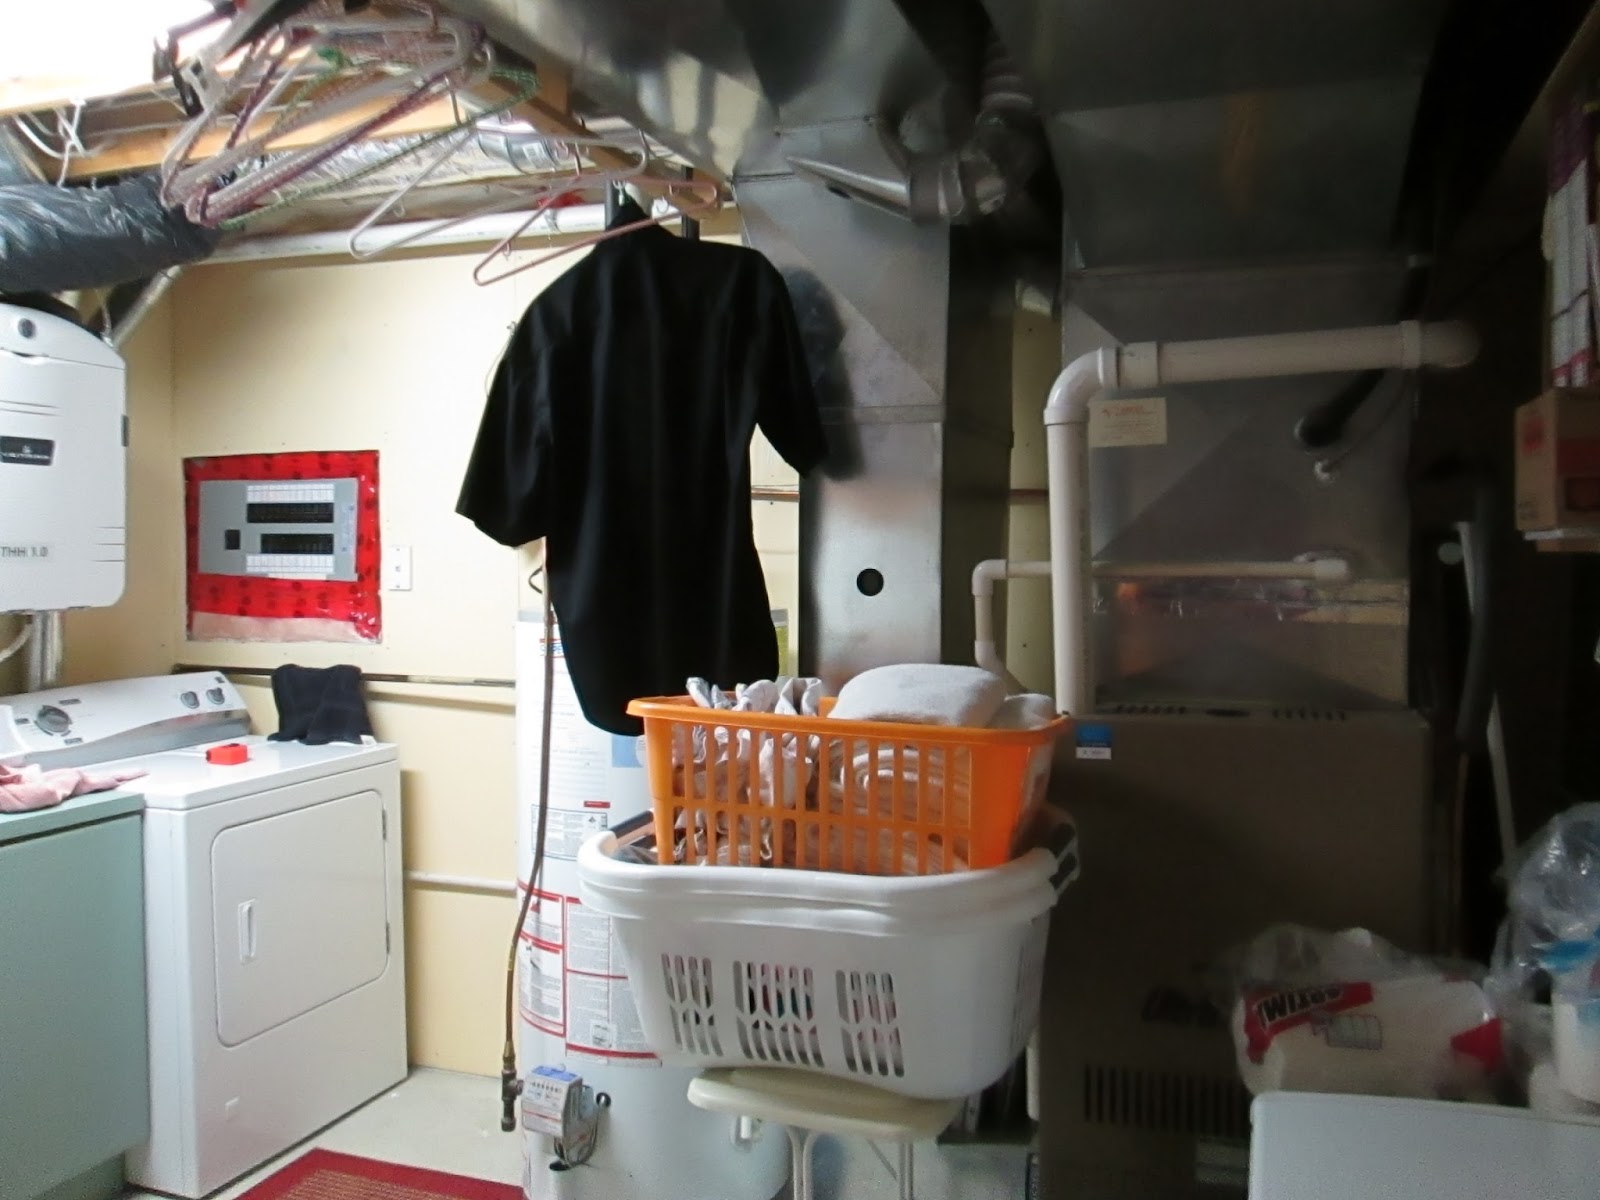
I was not lucky enough to have the forethought to have a separate laundry and utility room...ours are combined.  And as a result I get the pleasure of looking at exposed pipes and the furnace and hot water tank everytime I spend time in my laundry room.  Here is some more of what it looked like BEFORE...get ready for some scary stuff!


Storage was a major issue in here, so that was my main objective in doing this laundry room - that and it was just dark and dingy. 
 As it seems I spend a fair bit of my time in this room, it was time for an overhaul. 

We are keeping it real in these photos...cat litter box and all!!


McG and I have worked some magic over the last couple of months and now it's looking much better. 
 Is it my DREAM laundry room?
  NO - but it is a lot more pleasant to do laundry now - take a look!


We did some re-arranging and were able to block of some of the view of the furnace, but the hot water tank could not be covered...apparently that would be a fire hazard.  We also couldn't do anything with the ceiling.  The pipes and ductwork are just at too many different levels to be able to be done in our budget. 
 However, we were able to tile the floor!
 These are press and peel vinyl tiles that look like Travertine - they were 89 cents a piece on sale.
 The whole room cost just $75.


McG finished the drywall seams and painted the room with the leftover paint from the living room. 
He also took two leftover doors from our media cabinet makeover and covered the electrical panel. 
 A definite improvement!

  He took out the ugly counter and sink and in its place installed a shelving/folding table made from 2 hotel headboards that we bought at the Habitat ReStore for $10 each.  I used that great vintage bed sheet that I bought for 50 cents on our trip to the cottage earlier this month to make a skirt to cover the shelves.


The two white cabinets above were made from cutting in half a cheap pantry cupboard our daughter used to have in her bedroom.  It was sitting in McG's workout room, so that was FREE!!
 The "laundry" artwork was picked up at The Christmas Tree Shop for just 75 cents. 
 The floral canvas I had here already.


 Here's a close-up of the sheet...I mean curtain...and below is a closer look at the headboards we used for the shelving.


The raised edge is perfect and helps to keep my laundry baskets from falling off.

We moved the little freezer to the side wall and added the two white cabinets that used to be over the sink.  We took out the shelving that used to be between them and screwed them together before hanging them on this wall.  We also brought in an old bookcase that used to belong to McG's parents - it houses some storage for my scrapbooking supplies and other items that had no home.  It too got a curtain from that 50 cent bed sheet!

Here's a look at that whole corner from another angle.


Our storage issues were definitely addressed and there is no more staring at extra toilet paper and paper towel rolls in this room.  It has a calm feeling that makes doing the laundry a little bit nicer!

Cost breakdown for this project:

flooring $75
2 headboards for the shelving $20
sheet for making curtains 50 cents
laundry art 75 cents
paint - free
cabinets - free
TOTAL - $96.25

Have you completed a budget renovation lately??  I'd love to hear about it!

Friday, August 23, 2013

Burlap - Have you Jumped on the Band-wagon??

Burlap seems to be everywhere in Home Decor these days...I think you either LOVE it or you don't.

I'm not really into doing crafts other than knitting and making the occasional wreath for my front door, but burlap is really hot in the crafting world too.

I have a few burlap items in my home that I would like to share with you today.

First up some great candle holders.


 I love how the rustic texture they add to my home.  

My newest burlap addition I found last week on a trip to Home Sense (Canada's version of Home Goods).
I was in browsing for something that would work over the buffet in the dining room.  I had tried a few different pieces there but nothing  really seemed right to me....Until I found this guy!!
 

A chippy aqua frame, some burlap and a gorgeous needlepoint that encompasses all the colours of my home!!  

Y U M M Y!!! and I had to have it!!

It measures 30 x 30 inches so it's a great scale and fills up the wall quite nicely, and I'm thinking that was the problem with everything else I had tried there.  Here's a couple of more pics.


I love how it incorporates the teal from the kitchen along with the brown from the sofas and tan colours from the furniture in the living room.  And since this wall lies between both the kitchen and the living room, its the perfect tie in!
The best part was, it was in the clearance section...just $29!!
So - there you have it - my burlap! 

 I'm loving it...Do you LOVE burlap??

Cheryl
P.S. - to see some more great burlap creations, head on over to the burlap linky party over at 
My Uncommon Slice of Suburbia that's where I will be linking up!  See you there!


Monday, August 19, 2013

Thrifty Finds

Welcome to another Thrifty Finds post!  

This weekend McG had a golf tournament for work, so I had the day to myself!  With a pocket full of money and a long list of yard sales to hit, I ventured out after driving our son to work.

I was very lucky this week, hitting a great neighbourhood sale first.  I love it when there are a large number of houses all in the same block with stuff to sell!

 First up is a great down filled pillow in cream and navy and a large Tupperware bowl that was in mint condition - both just $2 each. Sloan felt the need to check out my finds too and photo-bomb my shot!


Next up - a fall pumpkin decor item (25 cents) and a notepad gift set ($3).


I picked up an artificial Christmas Tree and a cooler for McG - both just $5.  He's using artificial Christmas trees this year to cover his duck blind.  They were asking $10 for the tree but they gave it to me for $5!


Next a garden ornament and a white wire planter - each $2.


The planter looks lovely on my dining room table!


If you follow on Facebook, you got a sneak peek at this print earlier today - just $2.


And last, but not least, this wreath for $3.  It found an immediate home on the inside of my front door!


It was a great week for thrifty finds in my neck of the woods...did you get some thrifty finds this week??

I'd love to hear from you!

Tuesday, August 13, 2013

Thrifty Finds in Muskoka!

McG and I had an opportunity to do some exploring a couple of weeks ago while we were visiting friends at their cottage.

Our day-trip into Bracebridge Ontario found us stopping at the local Royal Canadian Legion for a HUGE yard sale!! 
 I managed to find a couple of great things and only spent $1.50!


A small enamelware pail with its wooden handle, a blue glass carafe, and a bed-sheet.
  You can see the colour of the glass better in this shot.  It's much like a great  blue Ball Mason Jar!


I LOVED the colours of the bed sheet and couldn't leave it there for 50 cents...I think its just what I need to finish up a storage solution in the laundry room...and that turquoise and orange and green pattern
...mmmm LOVE IT!!!
  Here's a closer look...


Oh and by the way...the laundry room is finally almost ready for a reveal!  It's only been, what, seven months since we showed you  "our dirty little secret".  Seven months we have spent on it, slowly making it more presentable...and it's still not my "dream laundry room" yet but its more functional and does look prettier than before!  This sheet will help to put the finishing touches on a storage solution in there.

Well, that's it for my Muskoka yard sale finds...
Do you visit yard sales while you are out of town???

I'd LOVE to hear from you - please leave a comment!!

Cheryl

Linking up @:
The Frugal Homemaker 

Saturday, August 10, 2013

Cottage Tour

Last weekend McG and I had the pleasure of heading up to cottage country here in Ontario to spend some time with friends.

We don't normally take a summer vacation now that our kids are grown, preferring to save our days to head somewhere warm in the winter.  This was a treat for the soul but also for the eyes.  So sit back, grab a coffee and get ready for a treat

...but REMEMBER...


'WHAT HAPPENS AT THE COTTAGE, STAYS AT THE COTTAGE"
(this cute sign was hung at the entry to the kitchen)

I guess I will start with the view and the deck.  The cottage was built around 1964 and sits on a lake in Gravenhurst, Ontario.  There is a main cottage and a "bunkie" that was made out of part of the garage.  Unfortunately I didn't get pictures of that space.  This is the view as you climb the stairs of the main cottage.  That is the neighbour's dock in the distance.


Once up on the deck, we were greeted with a great place to sit and visit and more great views.
  There was a definite peaceful atmosphere here.


The cottage is, or should I say was, one that originally had honey pine walls and a kitchen that was stylish back in the '60's when it was built.
 Here are two shots of what the cottage looked like when they purchased it a couple of years ago.


Don't you just love those orange Formica countertops??!!
They have put a lot of work and love into making this cottage a place that fits their family and lifestyle.

Now on to how the cottage looks now.
 First up, the Muskoka room or screened-in porch.  A great place to sit and read and I did just that on a couple of occassions.


In order to update the look of the cottage, they painted the walls a soft sky blue.
  They have a great gallery wall started here with some IKEA frames that are going to eventually hold  photos of people they have shared their cottage with and some artwork made by their daughter.
 The floors had yet to be updated when we were there, but they sent me a photo today that shows the floor redone!


This room is the only room in the cottage that retains its original floors.
 The rest have been replaced with a vinyl plank flooring that I swear looks like hardwood and feels like hardwood.  I thought I had a picture of it, but when I got home I realized I didn't. (ugh...I hate when that happens!)

Okay, now on to the amazing new kitchen sporting IKEA cabinets and butcher block counters.
  This is where I started drooling!!
 I have to say, I LOVE ME SOME WHITE CABINETS!!


The walls in the kitchen, dining room and living room areas were painted white, but all the ceilings were left the original honey pine.  I loved the" EAT" sign and the enamelware they had!

Here is a view into the living room/dining room from the kitchen.  I guess you could call it the great-room.  Again this room had been painted white, but still retained its original ceilings and beams


Here's the dining room portion.  It had a church pew against the wall, which was just gorgeous!  It is such a great idea and seats many during mealtime.


This was the original table that was there when they purchased the cottage.  However, they changed out the top with some lumber they stained and attached to the original legs.


The accessories all reflected and enhanced the cottage vibe.
The owners have a great sense of style and their choices in furnishings made the whole cottage experience so "homey".  The living room was no exception with its wood burning stove and great furnishings.


Again, casual comfort...with the added bonus of some modern day conveniences.  McG helped install a countertop over the washer and dryer while we were there.  Isn't it lovely?  It looks just like Carrera marble!


We enjoyed great company, great food and great views while we were there.
 It was a wonderful weekend that made both McG and I sad to leave. 

Now I will leave you with some views of the lake...


Great Adirondack chairs to watch the sunset.


...the morning mist coming off the lake.


Wasn't that a great cottage???

 Have you been cottaging this summer??

Thursday, August 08, 2013

Quick and Easy Homemade BBQ Sauce!

I'm not sure if your family is like mine, but we do LOVE a good BBQ sauce.  It's something that gets used year-round here in our home.  I find that it's hard to find a good BBQ sauce that's not too smoky in flavour.  I'm not really fond of a smoky taste.  To remedy that, I have taken to making my own sauce.  It's quick and easy and keeps a really long time.

Here's my recipe..

3 cups of ketchup
2 cups of mustard
2 cups of white sugar
1 cup of white vinegar
1 teaspoon of salt
1 teaspoon black pepper
1 teaspoon garlic powder
1 teaspoon cayenne pepper
1 teaspoon of chili powder


 There is no need to buy the expensive brand of ketchup and mustard for this recipe.  I use the store brand and it tastes just fine.  You can substitute a grainy mustard for this recipe if you wish, but I prefer the plain yellow mustard.
 
I combine all the ingredients in a large pot and bring it to a soft boil on the stove.  Once it begins to boil, I turn off the stove and scoop the sauce into mason jars.  This recipe makes 3-4 jars (not sure of the size).  They are not the large quart jars, but not the tiny pint jars either.  Two of the jars I use for this are actually an odd shape.  I guess I should actually measure how much they hold.  (maybe next time!)


I simmer the sauce and bring it to a soft boil so that the ingredients incorporate better, and the heat helps the jars to seal.  If you wish, you can skip this step, however, I would let the sauce sit for a week or two before using so that the ingredients can meld together and produce a better flavour.  I store my jars in the pantry until I open them; once they are opened, I store them in the fridge.

A batch takes me less than twenty minutes to make and what I like about it is that it uses ingredients I always have on-hand here at home.  This way you can whip up a batch anytime!

Do you make your own sauces?  I'd love to hear about your recipes - please leave me a comment!!

Cheryl

Tuesday, August 06, 2013

Cheap and Easy Changes in the Living Room!

Last week I completed a small project that has had a big impact in my living room.  Something so simple, I'm not sure why I didn't think of it sooner...

Back in the fall last year, I shared with you how we converted a bookcase from the seventies into a media cabinet for our living room (if you missed that, you can find it here).  I loved the look but I found the shelves to be very dark and I had to be careful in what I chose to showcase on those shelves because some items didn't show up well in this cabinet.


I knew that I could paint the inside of the cabinet, but I wasn't sure I wanted a "permanent" solution.  I was looking more for something that I could change out as I pleased and something that wasn't so time consuming as painting would have been.  I ended up picking up some foam board at Walmart.


It came in a 2-pack and each was 30 inches by 20 inches...more than I needed, but it was very easy to cut.

I used a tape measure to get the size of my cabinet opening, then transferred that measurement to the foam board.  I used a carpenter's knife and a contractor's square to make sure my cuts were straight.  


I just removed the tchotchkes and shelving from the cabinets and then placed the foam board into the back of the cabinet.  Then I just added the shelving and the goodies back in!  I didn't glue it in place - #1 - because I wanted the option of changing the look and - #2 - because the shelf holds it in place so there's no need to worry about afixing it to the back.


Here's a side by side view of what it looked like before and after with one side completed.


It really gives the media cabinet a whole new look and it's easily changeable.
  This is what it looks like completed.


It definitely showcases my decorative items much more than with the dark wood backing.  This project was very easy to complete and if I get tired of the look, it's very easy to change out.  You could  wrap a decorative fabric around the foam board to change out the look or even add wallpaper or wrapping paper to one side of it.

This project cost a total of $5.78 - a great cheap and easy way to get a whole new look in your room!

Have you done any cheap and easy projects lately??  I'd love to hear from you!

Cheryl