Monday, November 14, 2016

Decisions, Decisions

At the end of last week's post about our new "wood planked wall" in the master bedroom, I asked for your suggestions with regard to whether to paint or stain the wood.

I have to say that I am not surprised that most of you voted to paint it white.  The reason I wasn't surprised is because that was my first intent as well.  A nice creamy white, much like this...


But then, I headed to Pinterest, and found many examples of stained wood that I just LOVED!!


On a trip with McG to Home Depot to buy some supplies for his garage project, I picked up a small can of Weathered Grey stain, hoping that would help me to solidify my choice.


I grabbed one of the extra boards that we had in the garage and tried it out.


The piece I chose had some knots and some variation in the colour of the wood, much like most of the boards we used on the wall.

I did not use wood conditioner prior to the stain because the look I was hoping for was more mottled and not uniform.


I love how the wood grain shows and some of the natural colour of the woods shows through.

I'm really leaning toward this look and I think that the other walls will look great painted a creamy white along with the trim and closet doors.

Have I won you over...or are you still voting for white??

Cheryl

Monday, November 07, 2016

Getting Back to Work!!

HELLO!!!

I can't believe that I have been away from this blog for so long!!  I'm sure that some of you thought that we had fallen off the planet..and I feel that way too!

This little part time job turned into almost full time hours for the last three months.  That, together with McG taking the last six weekends to go duck hunting, has really put a damper on our project list.

BUT - this weekend, we seemed to get ourselves in gear.  The weather here was amazing at 60+ degrees. I think that helped to get us into the mood to work.


Back in the spring a co-worker of McG's offered him over 200 square feet of pine flooring for free. He was doing some work on his house and ripping it out and replacing it.  McG took it, knowing that I was bound to find a use for it.

I, like everyone else, LOVE the look of shiplap walls and I knew that I wanted to try it somewhere in the house.  And with 200 square feet of it, we could do a few projects!! (wink, wink!!)

McG cleaned it up by cutting off the tongue pieces which were pretty damaged up when it was taken out.  It had a vanished finish on one side, so we turned it around and used the unfinished side.


Before we began, we found the studs behind the drywall with a stud finder and marked them with a chalk line.  We started at the ceiling and checked our work with a level and measuring tape as we worked our way down the wall, making sure to stagger the joints.


The wall we covered was 12 feet long.  The project took us just a couple of hours to complete.


McG secured it with his cordless Ryobi trim nailer using 2 inch nails because we had to go through 3/4 inch boards and 1/2 inch drywall.  My job was to sort through the pile of boards and select which boards would go where.


I am loving the look of the shiplap, but now am torn as to whether to leave it natural, to stain it, or to paint it white.


I'm headed to Pinterest to search out some inspiration to help me make my decision.

I'd LOVE to hear what you would do!!

Cheryl

Friday, August 05, 2016

Just When You Think You Are Finished With a Project...

You know that great feeling that you get when you are able to cross something off your to-do list???

I had that feeling last week when I blogged about the changes that we made to the exterior of our house...

But this week McG decided that the covered porch off the garage needed more work...a "cheap, quick project" that would have big results.  So, who am I to say no!...well, I think that I should have.

Here's a close up of one of the photos I shared last week.  As you can see, the boards and posts were not in the best condition.


We had given them a quick fix last year by painting them black.  McG felt that to be safe, he would replace the posts and add new boards to the framing, with the hopes that either later this fall or early next spring he would be able to screen in this area.


The photo below really shows the wood rot on the roof supports.


McG cut back the metal roofing and the rotting end of the supports.


Then he supported the end of the roof and began to replace the posts.  However, the short brick knee wall was attached and had to be taken down in order to get the job done right.


What went from a 'cheap and quick' project, is now a big headache and will be more costly to finish up as now we will have to rebuild the short knee wall out of wood and then add siding to it to keep it waterproof.

I'm actually liking it fully open and am hoping that he changes his mind about screening it in. But then on the otherhand, it would be good to have it screened so that we could sit out there at night and enjoy the space without getting eaten alive by mosquitoes.  This project is obviously going to take longer than we thought, and it will take a bigger bite out of renovation budget.


The worse part of this project has been having to dig up the garden that I had created along the edge of it.  Hopefully those plants will survive in this heat until they can be replanted in.


I will keep you posted on our progress. We only have a few weeks left before our annual Labour Day BBQ so I'm hoping we don't run into any more problems on this one!!

Until then, I'm hoping when all is said and done, we don't regret starting this project - Has that every happened to you?  I'd love to hear your story!!

Cheryl

Wednesday, July 27, 2016

Summer 2016 - Changes to the Exterior of the House

It seems that again it has been a long time since I've posted...but...

I GOT A JOB!!  Yes, you read that right!!  I applied for a part-time position on a whim, got an interview, and got the job! I'm doing clerical work for a Chiropractic office here in the city, and I'm loving it! But it has definitely put a damper on the projects around here. McG also has had some changes to his work schedule. For most of the summer so far, he has been on the afternoon shift which means we have been on opposite shifts. It makes getting things done a bit more difficult. We have been enjoying the summer as well on the weekends and had a small getaway to St. Jacob's, Ontario a few weekends ago.

In between, we have finished painting the exterior of the garage.  It went from looking like this when we first bought the house back in 2014....


To this...


We used the same "Mined Coal" color that we painted the house with last summer and "Extra White" under the covered area to make it a bit brighter.  We painted the side garage door a bright red, and added the same red to a star we placed on the peak of the garage and a few other accessories as well.


A month or so ago,  we purchased a small awning for over the back door on Kijiji which is similar to Craig's List here in Canada.  It was in mint condition and fit perfectly over our door.  It was a great buy for just $50.


It really finishes off this area nicely and keeps some of the weather off the back steps.  It's great not having to stand in the rain while you try and unlock the back door.  It also keeps out some of the sun which heats up the family room.  This doorway faces south and those door handles can get quite hot in the sun!!

The final project outside so far this summer has been to put siding under the windows at the front of the house.  Although our home is vertical aluminium siding, for some reason there was never any siding put under the windows.  They were just plywood with some decorative trim.  McG worried about rotting and water getting in, so we knew all along that something had to be done.  We just weren't sure what.  We looked at many options, but decided on a stacked stone looking siding.

Here's a look at what the area looked like before...


And here it is now...


So there you have it!  I know that we've been away from the blog for awhile, but we've been busy.
Next project is to add some wide white trim around the windows and some stone to the gardens!

I'm hoping to be able to update you again soon!  Until then HAPPY SUMMER!!

Cheryl

Friday, June 17, 2016

Catching Up!

I know...I've been gone for way too long...life keeps getting in the way of my posts.

I have a few new things to share with you but none of them seemed a full post worthy so I'm sharing a Hodge- podge of things today...

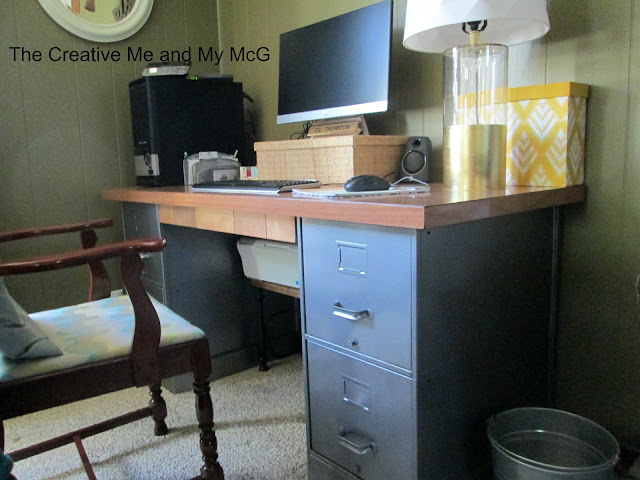
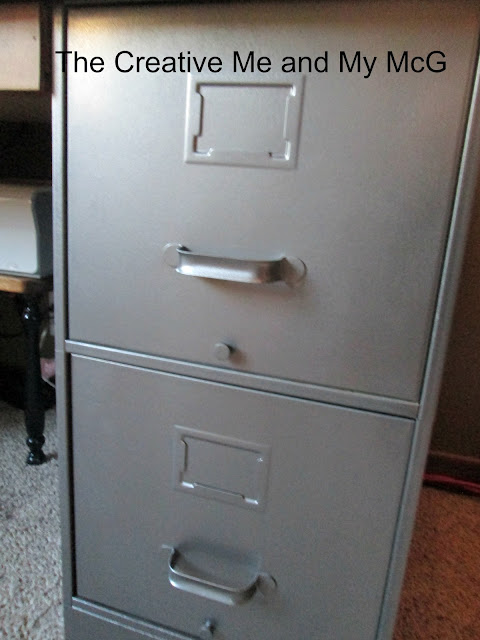
First up...a couple of months ago we purchased a second hand desk on a local facebook buy and sell site.  It was an old school desk, most likely from the 60's or 70's.  The reason I wanted it was because it had four deep filing drawers.


I neglected to take a before picture (great blogger that I am!) and before I knew it McG had it cleaned up and painted with a hammer pewter paint.  The top is a faux wood that looks much like butcher block with a shinier finish.


 I love the extra desk surface it gives me and of course the fact that we could consolidate our filing system into something more streamlined is a great bonus as well.


It has an industrial/masculine vibe that appeals to both myself and McG, and it looks great in our family room.

I've been busy for the last few weeks purging and boxing up all the things that haven't been used since our move here almost two years ago.  My daughter brought things over from her house and last weekend we had a yard sale.  It was Strawberry Fest time in our little town and we knew that there would be extra traffic here because of it.  We took advantage of that to hold our sale and I am happy to report that most of our stuff sold and combined we padded our pockets a little!!  Whatever didn't sell we boxed up and donated to our local Value Village, so nothing was thrown away.

We have been busy also getting the garage ready for paint.  I'm sure you remember that we painted the exterior of our home last year. It went from white with long blue shutters to a rich dark grey called Mined Coal.


We are now prepping the garage and "carport" for paint.  So far we have painted the roof with a rubberised paint to seal up and waterproof it.  Last year we also painted the supports of the overhang a rich black to freshen up the space.   The next two pictures below show what the space looked like when we first moved in.


Here's a more recent photo with the trim painted black.


The garage itself will be painted the dark grey colour, but under the "carport" area will be kept a bright white or perhaps a bright yellow...I'm still trying to decide on that!

I will be back soon with photos of the finished project...hope you stick around - until then - what's your vote for wall colour under the carport - I'd love to hear your suggestions!!

Cheryl

Saturday, May 21, 2016

Summer on the Porch

The weather here has actually been spring-like this week and I have spent the majority of my time outside in my daughter's yard.  She was away this week on vacation and hired me to tend to her yard while she was away.

Once I was finished over there, I was able to work in my yard and to get some shots of the front porch to share with you today.  Sit back and relax...lots of pictures coming your way!


 There have been a few new additions to the porch decor this year...


 These chairs McG gave to me at the end of last summer for my "BIG" birthday...I love them because they are rockers.  The runner I purchased at IKEA in Florida when we were there back in March.


I added some faux flowers under the porch because real ones don't get enough sun under here.
This table arrangement is made in a $5 cement planter that I found at a local thrift store back in the fall.  It came with all the greenery and I just change out the flowers for the season.  These flowers I purchased for a few dollars at a local Dollarama store.


This iron and wood pot holder used to be in the entryway of our other home and most recently in the family room here.  I've had it for a number of years and decided it needed to make it's way outside this year.  Under the porch it doesn't get much weather so it should hold up just fine.  It holds some faux flowers for a great punch of  fuss free colour on the porch.


 Also new this year, is the round "barrel" table that we purchased at Costco.  It actually opens up and holds the cushions for the chairs when we are not using them.


I've added some real flowers to the garden around the porch, for a pop of colour against the house.


This is the view from my chair...

I hope you enjoyed the tour of our front porch...I loved sharing it with you!

Thursday, May 12, 2016

A Rooster in My Kitchen

This week the weather has been pretty unpredictable and every time it's been nice out, I've been in the yard working in the garden and forgetting to take pictures of the front porch decorations.

It's rainy here this morning but the weather man promises some periods of sun before the next batch of rain hits.

I ran out to a local nursery this morning in search of a hanging basket for the porch but I came home with an addition to the kitchen.  Anyone who knows me knows that I have an affinity for birds...especially owls, cardinals and roosters.  Back a few years ago I let go of many of my roosters and moved on to owls, but while I was at the nursery this morning, I came across a rooster that I just had to have. He was a bit pricey, but I had a gift card from a friend that I had received last summer for my BIG birthday...I was itching to use it up!!


He's stenciled on some pallet wood that is gorgeous and rough.  I hung him in the kitchen near the entry to the family room.


I think the wood ties in nicely with the beams on the ceiling.


I woke Sloan up from napping when I was snapping my pictures.  The new window bench seems to be his favourite place to nap now.  I've had to put a small blanket there so that he doesn't leave too much hair there while he sleeps.


I promise to be back soon with shots of the front porch!!  That is if I can remember to get out there and take the photos!!


Wednesday, May 04, 2016

An Addition to the Kitchen

Hello Friends!

Another month has gone by without a visit from me so I thought that today I would share with you a new addition to the kitchen that we purchased last week.

If you remember we had taken the old kitchen island, removed the top and separated it into two cabinets that we placed on either side of the large kitchen window near the table.


I had asked McG to build me a window seat between the two cabinets, but with the heat vent under the window he was hesitant.  He said he would prefer a bench that was up off of the floor somewhat so that air from the vent could flow into the room

Last week we popped into our local Home Sense store while out doing some errands.  We wandered to the back of the store just to check and see if they had any benches.  And he actually found this one!


It was a bit of a splurge but I had a gift card that covered half of the cost!


It has short legs that allows the air to flow out of the vent and into the room which made him happy. I just love the fact that it is cushioned and comfy and the grey teal colour works wonderfully in the room.


It's more of a living room bench than a kitchen bench, but we will be spraying it with fabric protector, and will be covering it if "little ones" are visiting and using it.  I love that it's cushioned and comfy.  It fills the space quite nicely and leaves enough room for draperies ( that will be re-hung shortly),  And if I tire of it here or decide that it's not working out well, we can always move into the living room for extra seating.

I'm working on some photos of our spring porch, but the weather is not co-operating today...I will pop in with those very soon!

Cheryl