Thursday, November 29, 2012

Its Starting to Look a bit like Christmas...

Since I posted my kitchen tour this morning and you got a glimpse of some decorations going up - I thought I would go ahead and post about the wonderful arrangement I made for my kitchen "mantel"!


I started with an oblong metal planter that I already had.  It has an aqua tint to it which I love! Next I added faux pine boughs that I purchased 50% off at Hobby Lobby a few weeks ago...We don't have Hobby Lobby stores here in Canada so I went cross-border shopping - actually McG and I do that quite often.


They were very realistic and came with small pine cones attached.  I also purchased some boughs from Garden Ridge - these types of things are much more affordable in the US.  I didn't even use oasis to complete the arrangement.  I just laid them into the planter, making sure to leave them hanging over the sides a bit.  I layered in large pine cones that I had here already.


I added silver sinemay ribbon around the edges of the container, tucking it in gently, to add some sparkle to the arrangement.  I also added some glittery brown ornaments and some silver glittered wicker balls that I purchased at Dollar Tree.  


I also purchased the silver berry branches and the silver reindeer at the Dollar Tree store.  I have been there about 5 times since they opened here in our city a few weeks ago - they are a great resource for budget decorating!


It makes a lovely holiday display on the ledge between my kitchen and dining room.  Here's a view from the dining room...


It's just the first of my decorations to go up.  I am hoping to get my Christmas tree up this weekend, as well as, finish up the last few projects in the entryway.

Are you decorating for the holidays too?  I'd love to hear from you!

Cheryl

Linking up @:  DebbiedoosBeyond The Picket Fence,
                            SongbirdThe Cottage Magpie,
                            Sand and SisalSouthern Savvy Style,
                            The TablescaperCupcakes and Crinoline
                            It's so very CheriSetting for Four,
                            Three Mango Seeds
                            Uncommon Slice of Suburbia   
                            The Frugal Homemaker       

Kitchen Tour

Hey there!  Before we start breaking out the Christmas decorations around here, I thought I should give you a tour of the kitchen.  The living room/ dining room tour will be very soon - I'm so excited to show you!  Come on in and have a look around...


This is the view as you are walking into the kitchen from the dining room.  We have a raised ranch and as you enter the house you walk up 6 stairs to the open dining room and living room...then you travel this way to the kitchen.  Here you can see our new flooring as well...I love how it co-ordinates with the kitchen floor.


This is a better view of that bank of cabinets.  As I told you before we painted the kitchen Smoked Turquoise by CIL paints.  It really picks up the colours in our counter top and I love it! Before it was a pear green - you can see that colour on the island.


Here's a closer view of this wall.  The upper cabinets used to be on the wall between the kitchen and dining room.  When McG opened up the wall, we moved the remaining cabinets over to this wall and ordered more base cabinets to match.  We were very lucky to find them and a matching countertop since we didn't do this until seven years after the house was built.


Here's a view of  the island (and the pear green paint) and a view of the other side of the kitchen.  McG built this island out of a spare base cabinet.  He clad it in bead board and painted it.  The newel post legs were a garbage find that we re-purposed.  He tiled the top for an easy clean surface.  We eat most of our everyday meals here in the kitchen. Here are a few more photos of this side of the kitchen...


This view shows you how McG opened up the wall between the kitchen and the dining room.  Here too is our coffee station.  McG loves his Tassimo and this little cabinet holds all his coffee options quite nicely.


Here's a little sneak peek of some Christmas decorating...I am just itching to get going on it.  I have been seeing some pretty creative stuff out there in blogland lately.  There will be a post later this week on this beauty!  The majority of our decorations don't go up until after the 1st of December.

Thanks for stopping by - hope you enjoyed this tour of our kitchen!

Cheryl
Linking up @:
The Shabby Creek Cottage 
 

Monday, November 26, 2012

Happy Monday!

Hello there! - It's been a busy weekend over here...McG and I have been working on finishing up a few things - and while its not in any shape to be photographed yet - I thought I'd show you the vignette on our buffet which I put together last week.


I bet you thought you were going to see it decorated for Christmas - ha ha, fooled ya!  But don't worry I'll be decorating in the next week or so and I will be sure and update you all then.


The buffet was given to us by a friend of McG's Mom years ago.  She was moving to a smaller home and none of her children wanted it.  We took it in and McG refinished it.  It has had a place of prominence in our home since and I enjoy decorating it.  


The orchid was given to me by a friend recently.  It's my first one and I am hoping to keep it alive for awhile!
The placemat underneath is the same pattern as our new curtains which I showed you back in October.  The bird print was a thrift store score at only $3.99 and it picks up on the browns used in the dining room and living room areas.  A final reveal of our renovation will be up later this week!


The lamp on the other side of the buffet was inherited from McG's Dad...It has been in his family since the 1940's and I love how it goes with our new colour scheme.  I added a new shade from IKEA and rounded out the this area with my thrifted owl and a candle.

I hope you enjoyed this little peek at our dining room buffet...Next week the new buffet will be coming in and I will be gifting this one to a friend.  Although I love this one, its time to get the one that matches our new dining set into its new home!  Thanks for stopping by!


Cheryl

Friday, November 23, 2012

Dollar Tree Tablescape

The other day I posted this picture of what I purchased at the Dollar Tree to complete a submission for the Challenge over at Debbiedoos...


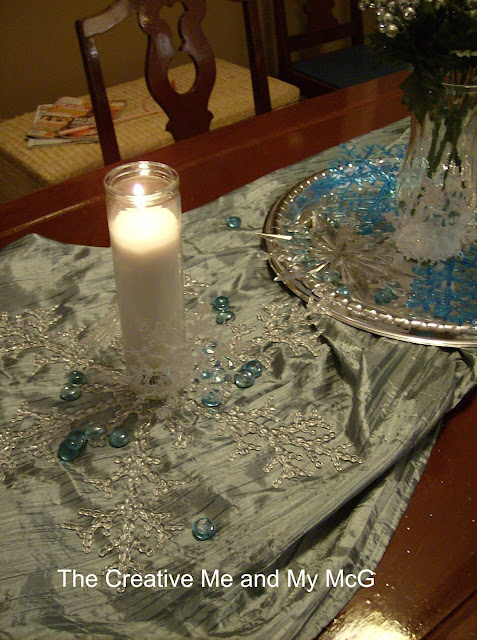
A silver plastic platter, Epsom salts, 2 candles, some acrylic snowflakes in assorted colours and sizes, a vase,  some silver berry picks and some aqua glass beads - in total I spent $15 for this challenge.  I knew I wanted to complete a table scape for my new dining room table - and you must keep in mind that the Dollar Tree here in Canada sells items for $1.25 and not $1.


Two of the snowflakes are at least 8-10 inches in size.  First I layered a piece of aqua fabric down on my tabletop.  Next I placed the tray in the center and them the two large snowflakes on either side of it.  On top of the two large snowflakes I placed the candles in the center of each.  On the center of the tray I placed the vase which I filled with the Epsom salts and then added some of the glass beads, and then into the vase I placed the 4 silver berry sprigs.  Then I randomly placed the other snowflakes on the tray and tabletop and then sprinkled some Epsom salts on top of the fabric and added the glass beads randomly as well.


I really love the aqua and silver colours - it has an icy effect that I can use not only through the holidays, but long after in the winter months as well.   I have a few supplies leftover...watch for another project soon!  Are you linking up to the Dollar Tree challenge?  If so, I'll see you there!

Cheryl

Linking up @:  DebbiedoosFox Hollow Cottage,
 The Tablescaper

Wednesday, November 21, 2012

Dollar Tree Holiday Challenge

Here's a sneak peek at some of the goodies I purchased at our new Dollar Tree Store to complete my submission to link up at Debbiedoos Dollar Tree party...check back on Friday and I will reveal my new tablescape!


Cheryl

Tuesday, November 20, 2012

Updating the Dining Room Chairs

Earlier this week I shared with you our "new to us" dining room furniture...


At that time I also shared with you the two fabric choices we were considering for the chairs.  Don't you just love that blue vinyl they are pictured in above? Y-U-C-K!!!


Both of these fabrics I purchased from Walmart for just $9.97 - they are upholstery grade fabric and each remnant was almost 2 yards of fabric 56 inches in width - can you say SCORE!!!


Although some thought that one of the patterns was too modern to go with the style of the furniture, that is the one that McG and I both liked the best, so we went ahead and started reupholstering the chairs last night.


First McG removed the seat from the chair and we removed the staples, and took off the ugly blue vinyl.  


Then we laid out the fabric (right side down) on our kitchen island.  We reused an old quilt for padding and the cut the fabric 2 inches bigger than the chair seat.  McG then stapled the quilt fabric on first, making sure to pull it very tight as he went.  Once that was completed he did the same for the fabric, trimming the excess off when he was done.


Then he re-attached the chair seats using new screws.  McG had to add some toothpicks to the screw holes to help re-inforce them as the previous screws were stripped and wouldn't go back in.  It took about a half an hour in total to complete one chair.


This is a closer view of the fabric.  It is a grey/taupe background with blue, aqua, yellow and chartreuse wavy stripes.  I can't wait for them all to be done - then we will be ready for the big living room/dining room reveal!

I think this fabric ties in well with the rest of the colours we have in the room and updates the chairs into the 21st century...ALL FOR LESS THAN $10!!

Cheryl

Linking up @:   The Ironstone NestNot Just a Housewife,
                           Savvy Southern StyleBeyond the Picket Fence,
                           Mod Vintage Life

Sunday, November 18, 2012

Styles of Christmas

What is your decorating style at Christmas? Do you go with the traditional red and green, or something more contemporary like black and silver?  Or maybe you like a more neutral decor using items found in nature like pine cones and shells?

 This is my tree from last year...


And there is Sloan, hiding amongst the gifts!  Silly kitty!

It's hard to tell from this picture, but our tree was red and lime green themed...it had lots of glittery feather-like picks, as well as red, green and gold ornaments - our walls then were a pear-green colour so the theme seemed to fit...

This year our living room and dining room area are painted a soft grey-blue called Canadian Sky by CIL paints and the kitchen is a teal colour called Smoked Turquoise.  I am dreaming of a new "slimmer" tree this year and have been on the lookout for the perfect tree - something smaller perhaps - in a pot that would sit atop a table and not take up so much floor space...because this year we have our new dining room furniture in the area that the tree was in last year...and our kids are older now (22 and 18) and they don't get excited to decorate with me anymore (insert sad face) - in fact its a job that I do pretty much alone anymore, except if there's something I can't reach and then McG jumps in to save the day! (He's really good that way!)

I have found a few different inspirations for this year's tree...


Isn't this one so serene - I really love the quiet colour palette.  This neutral tree might be a good option.


This blue one is lovely, however, I'm not sure adding another blue to the mix would work - I might like it better with some lime green mixed in or maybe if the blue were aqua instead.


This one has the lime green I crave, but with more neutral ornaments. And I love the starfish!

Or what about something totally different and unexpected!


What's your Christmas decorating style...do you match your tree to your decor, or go with something totally different that stands out and makes a statement?  And where do you place your tree - in the living room, or family room? I usually do one large tree and one smaller one in the basement family room.  I'd love to hear how you are decorating this holiday season!

Happy decorating!  (oh, and you can check these trees again at BHG.com)

Cheryl      

Saturday, November 17, 2012

Dining Room Furniture!

OK - if you are following The Creative Me on facebook, you would have seen this sneak peek I posted earlier this week...


Back in September, before we even started our current renovation, I found these lovelies on Kijiji (which is Canada's answer to Craig's List).  The listing showed 6 chairs, a dining room table, buffet/sideboard and a china cabinet...ALL FOR THE LOW, LOW PRICE OF $200.00 - (YES, PEOPLE YOU READ IT RIGHT, 200 BUCK-A-ROOS!!!)  I thought for sure it was a misprint, but no, when I contacted the seller, he confirmed it was $200 - I showed McG - who agreed we wouldn't find this bargain again and we should jump on it - WOO HOO! I was so excited, I called and made arrangements to go out the very next day...

We borrowed the neighbour's trailer (we just love this new neighbour - he's got all kinds of cool toys) and headed out - with tarps of course, because you know it was raining that day and we weren't waiting in case someone else had seen the ad and was dreaming about these beauties!


As you can see they have been re-finished using a very glossy mahogany stain/varnish...not really my style, but they really fill the space in the dining room well...The china cabinet has gone into the spare bedroom for now and the buffet is still in the garage, as we already had a buffet in the dining room.  This one is going to a friend of mine, and then the new matching one will take its place of honour.


I quickly added some style to the table...it was very sunny that day, so hopefully its not too bright.


The chairs are currently covered in a blue vinyl, which is quite ugly but I guess it was easy to clean for the prior owners.  I found the fabrics below at our local Walmart, each remnant was almost 2 yards of upholstery grade fabric for $9.97 each.


 Here's the fabric laying on the chairs so you can help me decide...


McG prefers the wavy stripes and I think I do as well.  The background is a greyed taupe and the waves are aqua, yellow and chartreuse green.  All those colours are in the tablecloths that I showed you here.  The darker small patterned fabric has the same teal colour as the kitchen, so I think I will use it to re-upholster the bar stools there.

This set will have to wait until spring to get its new finish - CHALK PAINT - cause its way too cold to play out in the garage now that the winter weather has set in...and I just don't have the room to do it inside. I am leaning towards staining the top of the table and the top of the buffet a dark walnut and then using a white or off-white chalk paint on the rest of the set...

I'd love to hear what you think about my dining room steal of a deal! - I can't wait to decorate this up for Christmas - a full living room/dining room reveal is very close to happening!

Cheryl

Linking up @:  Debbiedoos Newbie Link Party